Instructions
Download The Self-Inflating Plane Pal Instruction Card
Important:
- Plane Pal cannot be used during takeoff and landing as the aisles and exits must remain clear.
- Always follow any instruction given by the crew.
- Plane Pal is to be used where it will not obstruct other passengers. Please review seating the information provided here and ensure you reserve your seating prior to travel.
- Your child’s legs, not their head, should rest on the Plane Pal.
- Please keep your child’s seatbelt fastened at all times in case of turbulence.
SELF-INFLATING TRAVEL PILLOW INSTRUCTIONS
TO INFLATE
STEP 1
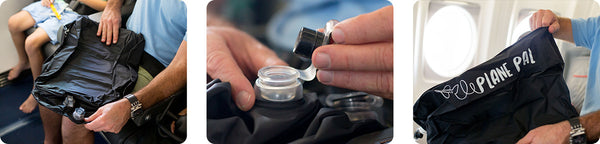
Once the captain has turned off the seat belt sign after take off, unpack your Plane Pal. From top to bottom, there are 3 parts: The yellow air- pressure safety release valve, the black and clear manual inflation plugs and the green self-inflation device. To begin, unplug the clear and black manual inflation plug. Stretch your PlanePal into shape. This reduces inflation time as it sucks in air as you stretch! Close the plugs and check your yellow safety valve is closed tight.

STEP 2
Place your Plane Pal onto the floor between your seat and the seat in front, where it will be used. Plane Pal can be used in three different ways depending on the amount of space in front of the seat. On a budget airline (with limited space) use Plane Pal upside-down. On an airline with more available space, use Plane Pal right-way-up. In a bulkhead or bassinet row, use Plane Pal right-way-up and turn lengthways.

STEP 3
To begin inflating, unscrew the green cap from the pump at the bottom. Push the black button on the pump to begin inflation. Allow Plane Pal to inflate to approximately 85% capacity to allow for pressure changes on board the aircraft.
Once Plane Pal is 85% inflated (squishy, not hard), press the black button on the pump to stop it. Screw the green pump cap back on. You are now ready for your child to recline, snooze or play.

SAFETY NOTE: Your child’s legs, not their head, should rest on Plane Pal. Your child’s seatbelt should be secured around their hips, not their chest, and fastened at all times in case of turbulence.
During extended long haul flights you may need to top up the air in your Plane Pal as changes in air pressure can cause contraction that decreases the volume of air.

TO DEFLATE
For rapid deflation: open both the manual plug and unscrew the yellow air-pressure valve. Ensure you refit your yellow valve immediately after deflation.
To pack Plane Pal away, roll it up starting at the end with no valves. Once rolled, place inside your Plane Pal bag.
Clean Plane Pal with a soft, damp cloth – do not use chemicals. Do not immerse in water, or machine wash, or tumble dry.
Should Plane Pal receive a puncture, discontinue use immediately.

TO CHARGE
Connect a USB-C cable to the pump to charge. You can do this while the charger is still fitted to the Plane Pal or remove it by simply twisting the grey cylinder anti-clockwise. To re fit simply insert and twist clockwise.
30 min charge should allow for up to 20 inflations. However we recommend a short charge time prior to each adventure.

WARNING
Plane Pal is not a toy. Use under direct supervision. Do not use as a flotation device. Do not jump onto Plane Pal. Take care to avoid sharp objects when you open, pack, store and inflate. Do not over inflate Plane Pal.
ORIGINAL MANUAL INFLATION PILLOW INSTRUCTIONS
Download Manual Inflation Plane Pal Instruction Card
TO INFLATE
STEP 1:
Once the captain has turned off the seat belt sign after take off, unpack your Plane Pal and pump. With the large valves fully open, stretch out and fully expand your Plane Pal. Plane Pal will inflate much faster if fully expanded.
Ensure that the Plane Pal’s smaller (clear) valve is open. The larger (black) valve should be closed for inflation. They ensure the air cannot escape while you are inflating Plane Pal.
STEP 2:
Before inflating, place Plane Pal on the floor in-between your child’s seat and the seat in- front.
Plane Pal can be used in three different ways depending on the amount of space in front of the seat. On a budget airline (with limited space) use Plane Pal upside-down. On an airline with more available space, use Plane Pal right-way-up. In a bulkhead or bassinet row, use Plane Pal right-way-up and turn lengthways.
Ensure the valves are placed on the aisle side so you can access them to inflate. Pictured above is the older model with two inflation points. The newer model has only one inflation point.
Plane Pal must be inflated to fill the space. DO NOT inflate it and attempt to squash it into the area.
STEP 3:
To begin inflating, connect the hose to the two-way pump.

Now plug the other end of the hose firmly into the black valve on the Plane Pal. Using two hands fully extend and depress the pump. Plane Pal will start to inflate. Continue inflating until Plane Pal is firm, but has some give to provide comfort.
Once Plane Pal is inflated secure the clear valve plug.

You are now ready for your child to recline and snooze. Your child’s legs, not their head, should rest on the Plane Pal. Please keep your child’s seatbelt fastened at all times in case of turbulence. The seat belt must be fastened around the Child’s hips or waist ( you may need to lengthen it when they are laying down to do this). It should not be around your Child’s chest or ribcage.
Please ensure you follow any instructions given to you by the crew whilst onboard.
During extended long haul flights you may need to top up the air in your Plane Pal as changes in air pressure can cause contraction that decreases the volume of air.
TO DEFLATE
For safety, Plane Pal is fitted with a rapid deflate valve. Simply pull the larger black valve open and apply pressure to the top of Plane Pal. Once the valve is pulled, Plane Pal will deflate in a matter of seconds.
To pack Plane Pal away simply roll it up starting at the end with no valves. Once rolled secure with the velcro strap and place inside your Plane Pal bag.

CARE
Clean Plane Pal with a soft, damp cloth. Do not immerse in water, or machine wash, or tumble dry. Do not use chemicals to clean Plane Pal. Should Plane Pal receive a puncture, discontinue use immediately.
WARNING
Plane Pal is not a toy. Use under direct supervision. Do not use as a flotation device. Do not jump onto Plane Pal. Take care to avoid sharp objects when you open, pack, store and inflate. Do not over inflate Plane Pal. Be aware of storing Plane Pal in the heat, this can damage the glue that binds the seams.